

I moved my blog (the one you’re reading now) onto Amazon Web Services . I was only paying about $10–$15 per month to host on GoDaddy, but it still felt too expensive. After all, my little blog doesn’t get much traffic these days 😭. It’s also important to me that I treat every development and deployment opportunity as a learning experience. A turnkey hosting service robs you of the chance to learn about the different components and layers in the website deployment process. This post recounts my setup process so that you, the reader, can follow this and deploy your own site on the cheap.
Note: Do not try this unless you want to become your own devops team + system administrator
There is also a long-term benefit I will reap in addition to putting knowledge in my noggin. A managed host is a fine on-ramp, but you’re renting someone else’s opinions about caching, headers, redirects, and TLS. Running it myself on AWS means I own every one of those knobs — and the bill scales with actual traffic, which for a blog rounds to nothing. But there’s also a longer game: the same account that serves this site can grow into whatever I build next, without a migration. I’m planning to deploy some SPAs for fun and/or profit in the mid-future. Consider this blog deployment the prototype for future web apps.
This post gives the whole setup, start to finish, using only the AWS CLI
. I originally created everything by console clicking. If you follow this to the end you’ll have a private S3
bucket served over HTTPS through CloudFront
, a real certificate from AWS Certificate Manager
, DNS in Route 53
, and a deploy that’s a single aws s3 sync.
The architecture
                 Route 53 (apex + www, A/AAAA alias records)
                                  │
                                  ▼
        CloudFront distribution  ──  ACM cert (us-east-1, *.example.com)
          • redirect-to-HTTPS         CloudFront Function (viewer-request):
          • HTTP/2 + HTTP/3             /dir/ → /dir/index.html
          • caches at the edge        CloudFront Function (viewer-response):
                                       security headers
                                  │
                          Origin Access Control (SigV4)
                                  │  (signed, HTTPS only)
                                  ▼
                 Private S3 bucket  ──  bucket policy allows ONLY
                 (Block Public Access     this distribution's CloudFront
                  fully ON)               service principal
Notes:
- The bucket is private. Nobody reaches S3 directly — CloudFront authenticates to it with Origin Access Control (OAC) , and a bucket policy trusts only this one distribution. Visitors only ever touch the CDN edge.
- An alias record is a special Route 53 entity that maps a DNS name to an AWS resource (CloudFront distribution) instead of an IP address.
Prerequisites
- An AWS account and the CLI installed and authenticated (
aws sts get-caller-identityshould work). - A registered domain. I’ll use
example.comthroughout — substitute yours. - A built static site. I use Hugo ; any generator that outputs a folder of files works.
Set a few shell variables so the commands below are copy-pasteable:
|
|
A quick word on Hugo
Hugo is my site generator of choice. I won’t belabor it — but you can go info diving if you’re interested
. The only thing that matters for hosting is that something builds your entire site into a public/ directory of plain files:
|
|
That folder — containing root index.html, per-page index.html files, images, CSS — is the artifact we ship to S3. Hold that thought; the very last step is a one-liner that copies it up.
Step 1 — Create the private S3 bucket
|
|
New buckets already default to BucketOwnerEnforced
(ACLs disabled), which is what you want — access is governed entirely by the bucket policy we’ll add later, not by per-object ACLs.
While you’re here, you can lock the whole account down so a future bucket can’t accidentally go public:
|
|
Step 2 — Request a TLS certificate from ACM (in us-east-1)
CloudFront can only use certificates from us-east-1, no matter where your users are. Request one for the apex (example.com, no www in front) plus a wildcard (*.example.com), validated by DNS
:
|
|
Keep that CNAME name/value handy — we’ll drop it into Route 53 in the next step, then wait for the cert to go green.
Step 3 — Create the Route 53 hosted zone
|
|
Take the four NS name servers it returns and set them at your domain registrar so the world delegates DNS for example.com to Route 53. Save the zone id:
|
|
Now add the ACM validation CNAME from Step 2 (fill in the name/value ACM gave you):
|
|
Step 4 — A CloudFront Function so directory URLs resolve
S3’s REST endpoint (the private one OAC uses) does not automatically serve index.html for a directory request. So a request for /posts/hello/ would 404. A tiny CloudFront Function
on the viewer-request event fixes that:
|
|
Step 5 — Create the Origin Access Control
|
|
Step 6 — Create the CloudFront distribution
This is the big one. Write a dist.json that wires together the S3 REST origin, the OAC, the function, the certificate, and the cache behavior. The CachePolicyId below is AWS’s managed CachingOptimized
policy.
|
|
A private S3 bucket returns 403 (not 404) for a key that doesn’t exist, which is why both 403 and 404 map to /404.html above.
Step 7 — Let only this distribution read the bucket
Now attach the bucket policy that makes OAC work. It grants s3:GetObject to the CloudFront service principal
, scoped by AWS:SourceArn to this exact distribution — so no other CloudFront distribution, and certainly no anonymous visitor, can read it. Because the policy names a principal rather than granting to *, S3 doesn’t score it as public — so BlockPublicPolicy lets it through.
|
|
Step 8 — Point DNS at CloudFront
Finally, alias both the apex and www at the distribution. Route 53 alias records
are special — they point at the AWS resource directly (no charge for the lookup), and you need both A (IPv4) and AAAA (IPv6). Z2FDTNDATAQYW2 is CloudFront’s fixed, global hosted-zone id for aliases — it’s the same for everyone.
|
|
Step 9 — Deploy: the one-liner that does all the work
Everything above is one-time plumbing. This is the command you’ll run for the rest of the site’s life. aws s3 sync
compares your local public/ folder against the bucket and uploads only what changed; --delete removes anything in the bucket that’s no longer in public/, so the bucket is always an exact mirror of your last build:
|
|
Build, mirror to S3, then tell CloudFront to forget its cache so visitors see the new version immediately. That’s the entire publish workflow — three lines, no FTP, no dashboard. I keep mine in a small deploy.py so a single command builds and ships.
Optional hardening — security headers without a policy
You’d normally add HTTP security headers with a CloudFront response-headers policy . If you’re on CloudFront’s free flat-rate plan, those policies are blocked (see the gotchas) — but Functions aren’t, so a second function on the viewer-response event does the same job:
|
|
Create and publish it the same way as Step 4, then add it to the distribution’s FunctionAssociations with "EventType": "viewer-response" alongside the rewrite function.
Two gotchas that cost me an afternoon
-
Don’t put dots in the bucket name. OAC talks to the S3 REST endpoint over HTTPS, and S3’s TLS certificate is a single-label wildcard,
*.s3.us-east-1.amazonaws.com. A bucket namedexample.comproduces the endpointexample.com.s3.us-east-1.amazonaws.com— two labels before.s3, which the wildcard doesn’t match — so the TLS handshake fails and CloudFront serves502. Name the bucket something dot-free likeexample-site. The bucket name is internal; it has nothing to do with your public domain. -
The CloudFront free plan blocks response-headers policies. CloudFront’s newer free flat-rate plan bundles a WAF, DDoS protection, DNS, and TLS at no cost, which is great — but it disallows a few “advanced” features, including attaching a response-headers policy. CloudFront Functions are allowed, so I set my security headers with a function instead (above). If you see
Distributions with the Free pricing plan can't have the following features, that’s this.
What it costs
Here’s the part that makes the whole exercise worth it. This is real billing for this site:
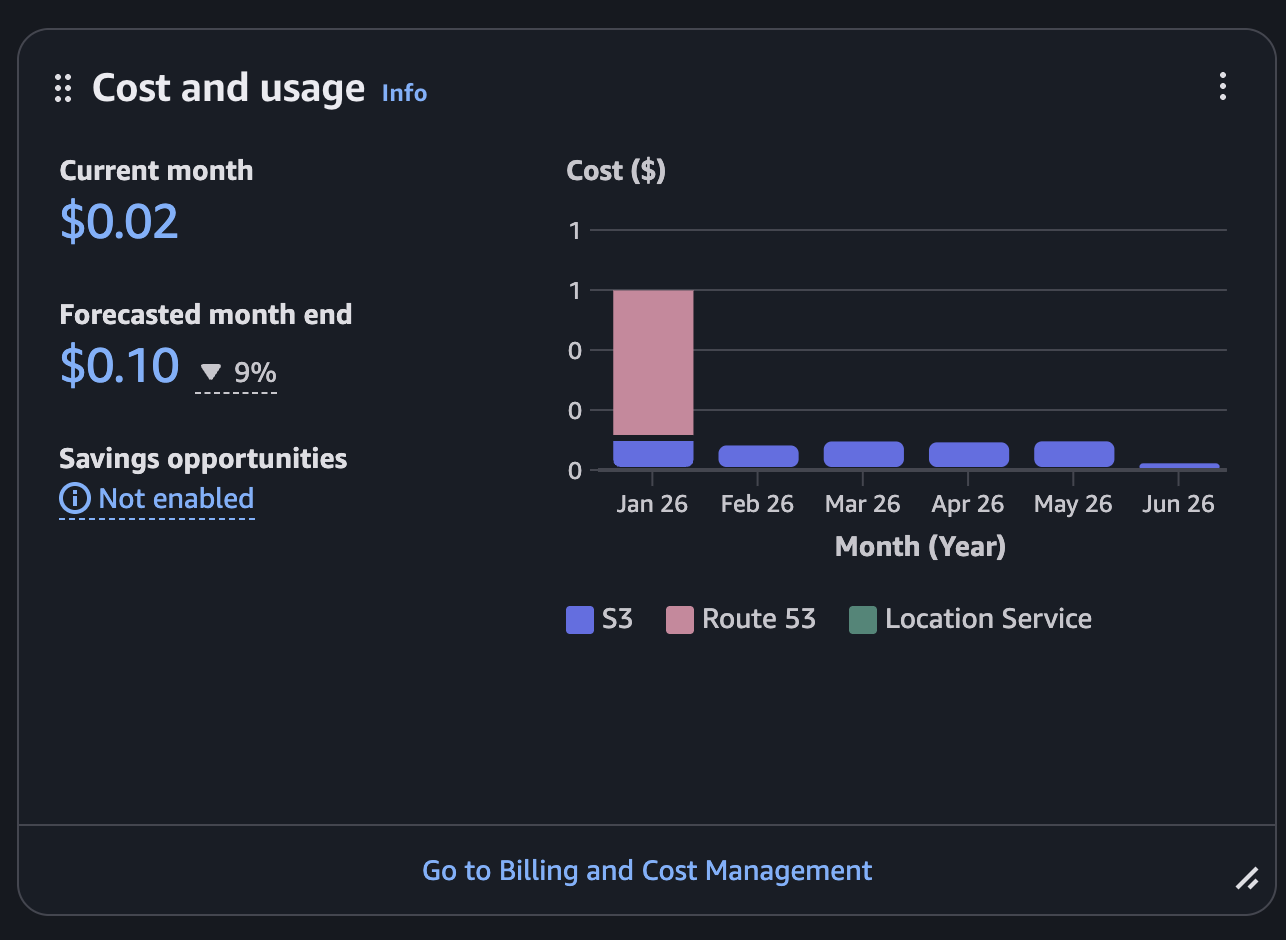
A forecasted ten cents a month — mostly the Route 53 hosted zone, with S3 storage and requests rounding to nearly nothing because CloudFront serves almost everything from its edge cache. No fixed monthly hosting fee, no plan tier, no paying for headroom I’m not using. If this site suddenly got popular, the bill would scale with the traffic and still be trivial; and if I want to bolt on an API, a database, or a second project tomorrow, it’s the same account, same CLI, same workflow.
That’s the trade I wanted: a little more setup up front, in exchange for owning every layer and paying only for what I actually use.